Where a watermark is allowed, and where it gets you rejected
Read this before you run a batch, because it is the difference between protecting your photos and having a catalogue refused.
| Platform | Primary catalogue image | Secondary images | Instagram / WhatsApp |
|---|---|---|---|
| Meesho | Not allowed | Not allowed | Fine |
| Flipkart | Not allowed | Discouraged | Fine |
| Myntra | Not allowed | Not allowed | Fine |
| Amazon | Not allowed | Discouraged | Fine |
| Your own site | Your call | Your call | Fine |
Marketplace image policies change. Check yours before a large batch — but the direction has been consistent for years: clean primary image, always.
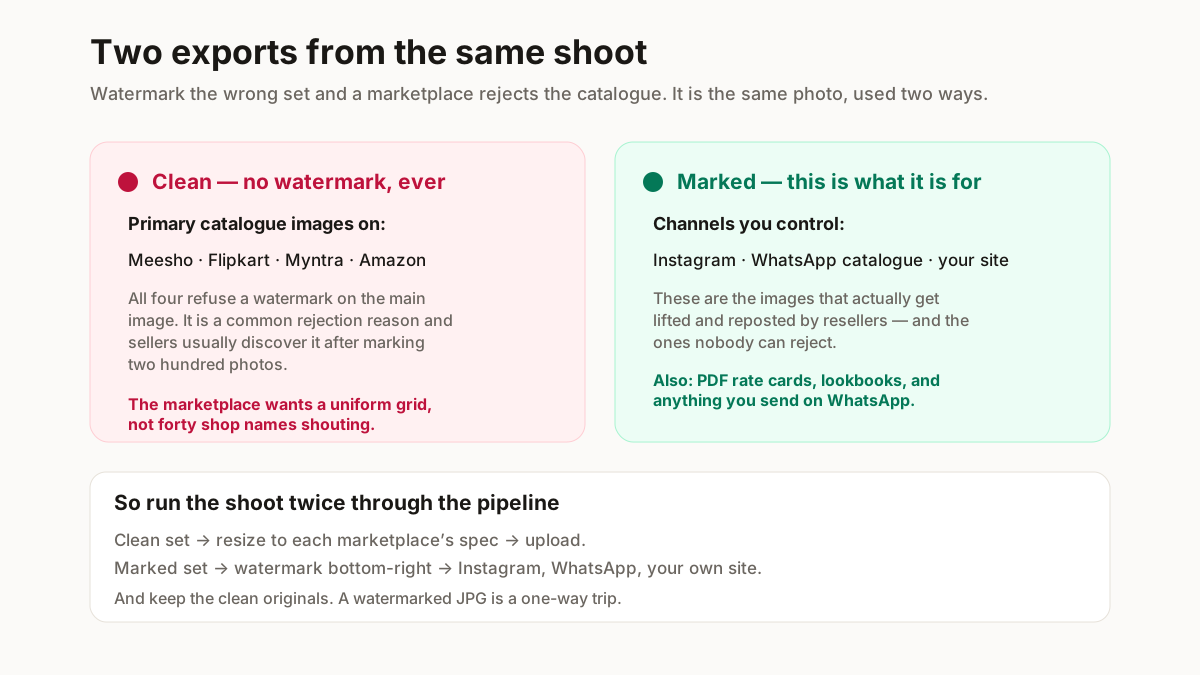
The rule is consistent across every Indian marketplace: the primary catalogue image must be clean. No logo, no text, no border, no watermark. The reason is not arbitrary — the marketplace wants a uniform grid of products, and a page of images each shouting a different shop name looks like a classifieds site.
Where a watermark genuinely belongs is everything you control: Instagram posts, WhatsApp catalogues, your own website, a PDF rate card. Those are the images that get lifted and reposted, and those are the ones nobody will reject.
So the practical workflow is two exports from the same shoot. Clean images for the marketplace — sized with the bulk resizer — and marked images for social and WhatsApp, from here.
Settings that survive a screenshot
The point of a watermark is that it is still there after someone has screenshotted, cropped and reposted your photo. That constrains the settings more than taste does.
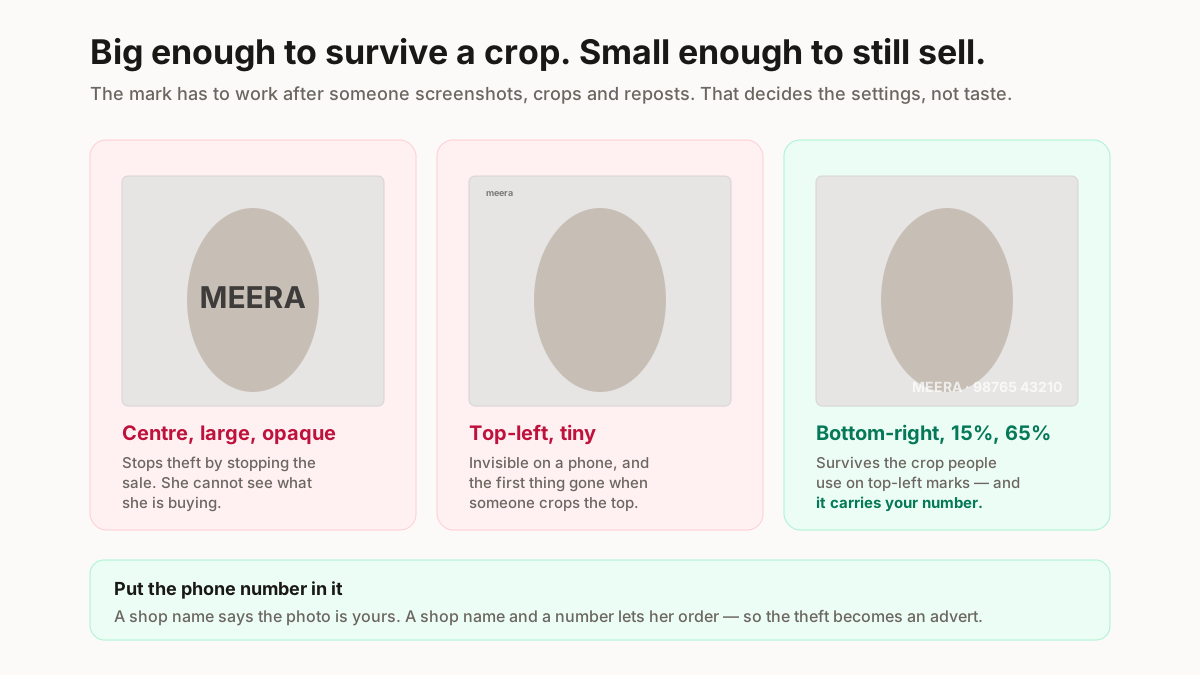
Bottom-right corner, always the same one. Consistency is what makes it read as branding rather than clutter, and a corner is the least intrusive place on a product shot. Bottom-right specifically, because it survives the crop people use to remove a top-left mark.
12–18% of the image width. Proportional, not pixels — this tool scales it, which is why a phone photo and a DSLR file come out matching. Below 10% it vanishes on a phone screen; above 20% it starts competing with the product.
60–70% opacity. Enough to be unmistakable, not so much that it dominates. Fully opaque reads as a sticker.
Never a giant mark across the centre. It does stop theft — by stopping the sale too. A customer cannot see what she is buying, and marketplaces reject it outright.
Include your phone number
The single highest-value tweak, and almost nobody does it. A shop name tells a reposted-image viewer that the photo is yours. A shop name and a number lets her order from you. Your watermark stops being a deterrent and becomes an advert that travels.
The reseller problem this actually solves
Worth being clear about what a watermark does and does not fix, because it is often bought as more protection than it is.
The common story: you shoot a saree properly, post it, and within a fortnight a reseller three cities away is running your exact photograph with her own price. She never held the product. If a customer orders, she buys from a wholesaler and ships something similar — and when it does not match your photograph, the review lands on the internet attached to your image.
A watermark does not stop her downloading the photo. What it does is make lifting it obviously lifted. She either crops it badly, clones it out badly, or uses it with your name on it — and all three cost her more effort than finding an unmarked photo elsewhere. Most of the time she moves on, which is the whole objective.
What it does not solve: someone who screenshots, crops the corner and reposts. Which is precisely why the corner choice and the size floor above matter, rather than being aesthetic preferences.
What logo file to upload
Four things make the difference between a mark that looks designed and one that looks stuck on.
PNG with a transparent background. A JPG logo carries a white box that will sit on your photo as a white box. This is the most common mistake and it is instantly visible.
Around 1000px wide. Large enough to stay crisp when scaled onto a 4000px photo, small enough not to slow the batch.
A white version as well as a dark one, if you shoot both light and dark products. This tool samples the area under the mark and picks a contrasting tone automatically for text marks — but a fixed-colour logo cannot adapt, so a dark logo will disappear on a black saree.
No logo? Use text. A shop name set cleanly is better than a bad logo, and it is what the tool defaults to. Type your name and number, pick the corner, done.
Doing it in Photoshop or Canva instead
Both work, and both are slower for a batch. Worth knowing when they are the better answer.
Photoshop actions and batch
Record an action that places your logo and sets opacity, then run File → Automate → Batch over a folder. Genuinely powerful, and it handles anything this tool cannot. The catch is that an action recorded in pixels does not adapt to different image sizes — a mark placed for a 4000px photo lands wrong on a 1200px one. Record against a fixed canvas size, or resize the folder first.
Canva
Fine for a handful of images, and pleasant to design in. Bulk Create exists but is aimed at text and data rather than watermarking a folder, and on the free tier you will be placing images one at a time. For eighty product photos it is an afternoon.
The honest summary: Photoshop if you already own it and your images are one size, Canva if you want to design the mark — then bring the finished PNG back here to apply it across the shoot.
Where this sits in the photo workflow
Order matters, and getting it wrong means doing the work twice.
Shoot → clean up → resize → watermark → publish.
Watermark last. Resizing after watermarking rescales the mark along with the photo and can soften it; running background removal after watermarking will happily cut around your logo. Do the destructive image work first and stamp at the end.
Keep your clean originals. Always. A watermarked JPG is a lossy export and you cannot get the original back out of it — and the day a marketplace rejects your catalogue for a watermark, the clean files are what saves the afternoon.